diy tiled tray & tiled coasters
finally one that looks good from all angles aka crisp clean sexy sides


need
- tiles of your choice (these are called subway tiles)
- mdf base to match your desired tile pattern (5 mm thick mdf is what I went for)
- tile glue or any kind of glue
- grout
- all purpose glue
- framing profiles in gold (brass) or white ... you can get them in all kinds of metals and plastic finishes at the hardware store (mine are 15x15mm)
- handsaw to cut your framing
- grout
- gloves
- ruler or something to make a 45 degree line

first plan your size.
I went with a 30 x 40 cm mdf board, if you plan to use tile spacers get your tiles and spacers first and lay them out with spacers to get the exact measurements with the spacers in between.
you can use these mosaic sheet mats, if you're not about the spacer game. on the mats they are preset so you only have to glue down the whole mat.
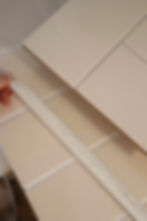
I went with no spacers and just put the tiles super close to each other, you'll still get a tiny little grout gap.

the glue
for such small projects I tend to go with hot glue, its easy and fast and holds tiles super well. I feel its best to put the hot glue on the mdf and then the tile on top, since the tile is cold the glue hardens super quick, so make sure you squeeze and wiggle it in place instantly when you lay down your tile.
of course you can use tile glue, and I would recommend with projects like a table top, its way faster than hot glue on big surfaces.
both works.

The cover up
once your tile is set and glued on you can take care about the edge.
I've made several projects now using brass and plastic profiles, both works the same way, you cut them the same length as your tray (maybe 1 mm longer on each side to prevent gaps at the corners

the profile has two sides one thats going under the tray and one thats going to be shown as the outer edge of your tray.
the side thats shown on the side is just cut to match the measurements of your tray
(2 pieces 30 cm 2 pieces 40 cm in my case)

the side of the profile thats going under the tray is the same length minus a 45 degree corner. this way they won't overlap underneath the tray and will sit flush all around.

cut the side part just straight down and then angle the saw to cut away the 45 degree corner

thats how you wanna cut them, they'll meet with the 45 degree angle at the bottom and flush in a straight line at the side thats seen

thats the tray upside down, if you hand cut the profiles they might be a slight bit wonky but I just squeezed in white grout afterwards and the gap was closed.
once all 4 sides are cut take some hot glue or all purpose glue and glue them in place.
I put a strip of glue right in the corner so when I pushed it onto the tray the glue distributed itself through the profile but I wasn't squeezing out, so don't put too much

so thats the profiles on. I decided to add some wooden pearls as little feet to elevate it a bit but you can just keep it flat.

thats the little feet, I just glued them on with hot glue


The Grout
ok we know we can dye grout any colour . but I felt just like plain white to match the profile outer edge in white.

mix your grout to a paste like consistency, I just smear it across the surface and into the grout ridges with ma hands wearing gloves.
super handy is one of these sponges to smooth out the grout once distributed, I just dampen it and run it across the whole piece to even everything.

don't forget to fill the space between the profile and the tile to get a super finished look.
let dry and wipe clean once completely cured.

and thats done. as you can see I made a topper for this cabinet just as I made the tray wit mdf as base and then a brass profile to cover the raw side. I feel this totally elevates the whole thing a good bit.


The coaster version
is basically the same just in much smaller

need:
- mosaic tiles
- mdf in 0,5 mm
- brass profile 15mm
- saw for the mdf & one for metal
-hot glue or tile glue
- grout
- a ruler with a 45 degree

plan out how big you want your coasters to be and mark the size on the mdf.
you can peel the tiles off the net base and reset them. I peeled four off and turned them to get a cute pattern
cut your mdf to match your tile sleeve, really go with the measurements of your tile, if you plan to use spacers, lay your tiles down with spacers ans measure how big of a mdf you need.

once cut put your tile on one more time to make sure they fit, just in case you've had a woke cut with the saw or something.

then match your brass profiles to the length of the mdf. I try to make them 1 mm longer on each side to really have them touching at the corners.
same as with the tray: you need the side of the profile to be cut to size just straight down, and the side thats going under the mdf needs to have the 45 degree corner cut out so the profiles don't overlap at the corners and lie flush.
do this for all four sides

then take your metal saw and cut them all to measure.

once all are cut you can place them around the mdf to glue the tiles down, this way you will make sure that your tiles won't stick out too much.
I like to use hot glue on such small projects, but its up to you.

once the tiles are glued on go ahead and glue the metal trim on the sides, I used hot glue for that as well.

once all sides are glued there's just one last step: the grout.

grout as usual: if you use brass profiles be a bit careful to not get too much on the brass, it tends to react and makes a black residue, wich can fuck up your grout color, especially white one. but if you try to not rub it onto the brass like crazy its fine!

once dry its done!


