diy wavy headboard
not a mirror but still freakin' aesthetically pleasing (a few weeks after I made this i stripped the green velvet and used teddy fabric - still the same)

"some design background to get started"
Jean Royère designed a whole variety of wavy objects around the 1940s and 50s from mirrors, cabinets, tables, chairs to lamps every object features the just so loved curvy edge. So called 'ondolation'. Unfortunately all of these pieces are more or less super rare and expensive collectors pieces.

still I would absolutely recommend researching Jean Royère a bit if you're into vintage design. Over all its a delightful variety of objects, coming across super modern considering the actual trends.


Speaking actual trends: Gustaf Westman won everyones heart with his version of the curvy mirror. A little bulkier, a little pop art-y with bigger waves and bold pastel colours. Especially the much rounder corners give the whole design a slightly more youthful look. We all know and love them.

"after having made lots of different variations with a wavy outer edge I felt like it was time for a kinda fusion mirror between these two. just because there's something about floor length mirrors. So I did one highly inspired by the Royère shape but still in pastel. „

something one is always left with when making these is the whole inner part of the frame. basically a big chunk of wood with waves. I figured there has to be some cool way of using it as is. because if you're careful when cutting the wood you can leave it all in one piece. I know - its more for the non first timers. I wasn't that precise with a jig saw the first times either. But you'll get there. Also totally an option: just get a piece of wood and make it wavy, making a mirror beforehand is tooootally not a requirement. Over all this is more or less meant to be an inspiration to reuse and repurpose leftover materials from prior projects.
So the diy part - or lets say the making of

Need:
piece of wood as a base (I used 10mm thick MDF)
padding or foam (I used 5 cm thick padding)
fabric (should be somewhat thin and stretchy)
spray adhesive
hot glue
staple gun
hardware to hang the piece
scissors & pen

to get started:
as mentioned I had a ready to go wavy piece of wood. How to get it all in one piece when cutting a mirror frame: drill holes big enough to fit your jig saw blade in and cut your way to your prior marked line. really try to take your time and cut super slow. this way you wont have to make adjusting cuts and end up with the middle of the frame all in one piece. I drilled several holes for my blade but ended up just using one. the front left side corner is where I started cutting. from there I just went through all the wiggles. And ended up where I started.

cut yourself some wood if needed
so if you (understandable) don't have a wavy piece of wood at home get yourself a slab of wood, decide on a shape you like and cut it out. can be any shape really.
next step is to get some padding or foam. I went with padding because foam tends to be extremely expensive and the 5 cm thick padding was super cheap. so I went with this option. I feel like since you just lean on it its totally soft enough. for a chair to sit on it would be a little too soft.

get your padding ready
next take your wood as a template and draw around with a pen suitable for foam or padding.

cut around your markings to be left with the whole piece once in padding and once in wood

line up your padding with the wood backing.

secure the padding
to keep the padding from sliding around I glued it onto the mdf board with hot glue. I haven't tried the spray adhesive, because I got it a day later, but I can imagine it would work here too. But hot glue was totally fine and working for me.
the fabric
one quick word regarding the fabric choice: if you plan on making similar super small waves be sure to get a rather thin and more importantly: somewhat stretchy fabric. otherwise you won't be able to get the fabric smoothly around the little waves. too thick fabric will bulk up, and you totally need the stretch to get the curves right.
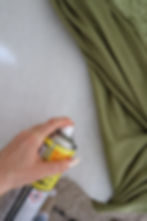
cover the padding lightly with spray adhesive and glue your fabric on. try to not overdo it with the glue, some glues can seep though the fabric if you use too much.

the stapler
what I felt was the trickiest part: the staple action. now having done this piece - I would recommend to start off with the waves facing inwards, the 'valley' of two 'hills' if you will. staple this part first by pulling the fabric in direction of the wood backing. I made some cuts to relieve a bit of the tension building up between two 'hills'. but also: don't cut too far. really take your time, go super slow, and just staple every centimetre you can. the more staples the better I felt.

I had some super tricky ‚valleys‘ cause I cut away the excess fabric too early and cut a little too wide into the fabric to relief some tension.
make sure you always have enough extra fabric, cleaning the back up is not really something to think about unless you’ve everything stapled. Trust me.

once I had everything secured I cut away some of the loose bits of excess fabric. I went in with hot glue at some spots to secure the fabric and to stop it from fraying. especially at places where I had super close to the edge staples.

Hardware to hang it secure
I got these (no clue what they are called) brackets to hang it to the wall. you can easily slip them over a screw or a nail.
don't come for me because of my hot glue massacre haha.

measure how far the two brackets are apart from each other and mark that width on your wall to get two screws/ bolts to match the brackets. make sure they are at the same height to have it hanging straight.


Pictures sourced via Pinterest for the design inspo part.