top of page

well that's a title - basically its a mix of the diy headboard and the cardboard roll side table cause I had leftover from both.


Need:

- a piece of wood or MDF as the base

- cardboard tubes or wooden legs

- padding (mine is 5 cm thick)

- fabric that is sort of stretchy

- spray adhesive

- staple gun

- jigsaw to cut your wood

- handsaw to cut the legs


first and foremost

tbh I skipped taking pics of the first steps, if you want pictures check out the headboard blog post.


cut your wood into your desired shape and use it as a template to cut your padding in a matching shape. I used two layers of padding in this case for extra super plush feel.


glue the two layers of padding with the spray adhesive together, same with the wood base, spray it with the adhesive and glue the two layers of padding on top.


no to wrinkled fabrics

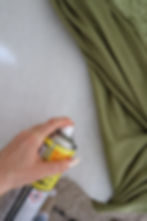
next spray the top of the padding with adhesive and glue your fabric on, make sure you don't get wrinkles. don't go too heavy on the glue, to prevent it from seeping through.


cut your excess fabric but leave about 10 cm on each side extra to have enough working fabric for the stapling part.


flip it

turn your top part upside down and put in on the floor to have a stable underground for the stapler.


more staples - more staples

start to staple the fabric onto your wood backing starting at one edge. pull lightly, but not super crazy, since the fabric is a bit stretchy. work your way around the whole piece.


snatch the curve

I feel its easiest to do the biggest curves first and then work your way around, this way you don't pull it too much and totally relocate your padding underneath.


depending on your shape the curves can be a bit tricky. starting at the 'valley and working your way to the top is easiest I feel.


LEEEEEGGGGSSSS

once you've stapled everything in place, start with your legs. I decided on the cardboard tubes because I had them at home. I cut one in half to get a low stool.


depening on what you wanna use it for, go with two or four legs of your desired height. you can totally just do a padded top with some cool furniture legs like pin needle legs, what ever you fancy.


I like me my cardboard tube.


plush leg who

I decided to cover the cardboard in the same fabric for an over all plush look. Spray the tube with adhesive and roll it with some extra at the top and bottom onto the fabric, again mind the wrinkles


neat leg tho

once covered cut the excess fabric leaving extra to make it look neat.


nice tuck

I went around the whole leg and stapled the heck outta this thing to have a nice and clean edge.


I did this on both sides and tucked the leftover into the tube.


burrito flap wrap

to get rid of the raw edge I tucked it into the extra fabric and folded it over to be hidden.


I secured the flap with staples as well for extra durability


the glue - yes the glue

I hear ppl scream already, yes I glued the legs on. since MDF is superb to glue as well as cardboard I just did it. the glue seeps through the fabric into the cardboard and the MDF. I used contact glue wich means you put glue on both sides let it cure to get tacky and then you press both sides together, this way you get a super stable connection.


thats to the glue. If you use other feet that need screws, screw them to the bottom (make sure your wood base has a decent thickness) or screw them on before you glue the padding onto the wood and screw them in from up top.


I pressed the glue over night and boy they are stuck on there, super stable.


not a mirror but still freakin' aesthetically pleasing (a few weeks after I made this i stripped the green velvet and used teddy fabric - still the same)


"some design background to get started"

Jean Royère designed a whole variety of wavy objects around the 1940s and 50s from mirrors, cabinets, tables, chairs to lamps every object features the just so loved curvy edge. So called 'ondolation'. Unfortunately all of these pieces are more or less super rare and expensive collectors pieces.

still I would absolutely recommend researching Jean Royère a bit if you're into vintage design. Over all its a delightful variety of objects, coming across super modern considering the actual trends.


Speaking actual trends: Gustaf Westman won everyones heart with his version of the curvy mirror. A little bulkier, a little pop art-y with bigger waves and bold pastel colours. Especially the much rounder corners give the whole design a slightly more youthful look. We all know and love them.


"after having made lots of different variations with a wavy outer edge I felt like it was time for a kinda fusion mirror between these two. just because there's something about floor length mirrors. So I did one highly inspired by the Royère shape but still in pastel. „


something one is always left with when making these is the whole inner part of the frame. basically a big chunk of wood with waves. I figured there has to be some cool way of using it as is. because if you're careful when cutting the wood you can leave it all in one piece. I know - its more for the non first timers. I wasn't that precise with a jig saw the first times either. But you'll get there. Also totally an option: just get a piece of wood and make it wavy, making a mirror beforehand is tooootally not a requirement. Over all this is more or less meant to be an inspiration to reuse and repurpose leftover materials from prior projects.


So the diy part - or lets say the making of


Need:

piece of wood as a base (I used 10mm thick MDF)

padding or foam (I used 5 cm thick padding)

fabric (should be somewhat thin and stretchy)

spray adhesive

hot glue

staple gun

hardware to hang the piece

scissors & pen


to get started:

as mentioned I had a ready to go wavy piece of wood. How to get it all in one piece when cutting a mirror frame: drill holes big enough to fit your jig saw blade in and cut your way to your prior marked line. really try to take your time and cut super slow. this way you wont have to make adjusting cuts and end up with the middle of the frame all in one piece. I drilled several holes for my blade but ended up just using one. the front left side corner is where I started cutting. from there I just went through all the wiggles. And ended up where I started.


cut yourself some wood if needed

so if you (understandable) don't have a wavy piece of wood at home get yourself a slab of wood, decide on a shape you like and cut it out. can be any shape really.


next step is to get some padding or foam. I went with padding because foam tends to be extremely expensive and the 5 cm thick padding was super cheap. so I went with this option. I feel like since you just lean on it its totally soft enough. for a chair to sit on it would be a little too soft.


get your padding ready

next take your wood as a template and draw around with a pen suitable for foam or padding.


cut around your markings to be left with the whole piece once in padding and once in wood


line up your padding with the wood backing.


secure the padding

to keep the padding from sliding around I glued it onto the mdf board with hot glue. I haven't tried the spray adhesive, because I got it a day later, but I can imagine it would work here too. But hot glue was totally fine and working for me.


the fabric

one quick word regarding the fabric choice: if you plan on making similar super small waves be sure to get a rather thin and more importantly: somewhat stretchy fabric. otherwise you won't be able to get the fabric smoothly around the little waves. too thick fabric will bulk up, and you totally need the stretch to get the curves right.


cover the padding lightly with spray adhesive and glue your fabric on. try to not overdo it with the glue, some glues can seep though the fabric if you use too much.


the stapler

what I felt was the trickiest part: the staple action. now having done this piece - I would recommend to start off with the waves facing inwards, the 'valley' of two 'hills' if you will. staple this part first by pulling the fabric in direction of the wood backing. I made some cuts to relieve a bit of the tension building up between two 'hills'. but also: don't cut too far. really take your time, go super slow, and just staple every centimetre you can. the more staples the better I felt.


I had some super tricky ‚valleys‘ cause I cut away the excess fabric too early and cut a little too wide into the fabric to relief some tension.


make sure you always have enough extra fabric, cleaning the back up is not really something to think about unless you’ve everything stapled. Trust me.


once I had everything secured I cut away some of the loose bits of excess fabric. I went in with hot glue at some spots to secure the fabric and to stop it from fraying. especially at places where I had super close to the edge staples.


Hardware to hang it secure

I got these (no clue what they are called) brackets to hang it to the wall. you can easily slip them over a screw or a nail.


don't come for me because of my hot glue massacre haha.


measure how far the two brackets are apart from each other and mark that width on your wall to get two screws/ bolts to match the brackets. make sure they are at the same height to have it hanging straight.


Pictures sourced via Pinterest for the design inspo part.


NEED:

- a base piece of wood in your preferred size (mine is 100cm x 30 cm)

-wood pieces to create the shelving part: a frame around the whole base plus dividers for each little unit (i used 2 cm thick wood, ideally wood with some kind of coating to prevent from too much humidity soaking in)

-wood glue

-gloves

-screws for wood & drill

-Plaster ( I used one I found at the hardware store sold as 'building plaster' it is normally used to close up walls after putting electric cables into the wall) I got two 5 kg bags of powder that you mix up with water to get a workable consistency


(its a few months since I build this shelf now and I would totally recommend to use coated wood like my base in the pic here, if you use MDF make sure to seal it to keep it from soaking up moisture ad swelling )


Construct


first build your frame glueing the wood panels on top of the base

(you'll screw them on from the back later. I just find it easier to glue everything in place first, et it dry and then flip it and screw them secure from the back)


plan your dividers to get a view for how the compartments will look


i went with a few small and two tall ones on each side, but you can do this as you like the look of it


glue the shelf pieces onto the base board and let everything dry.

i used quick drying wood glue and waited about 2 hours before i started screwing everything tight


Make it sturdy


once the glue is dry flip your shelf upright and start to secure the wood panels with screws, drilling from the back.


i would recommend to drill pilot holes to avoid splitting.


the more screws the more stable its gonna get. you don't need a hundred but its important to create a stable base since the plaster will be adding a lot of weight.


drill through the meeting shelving parts at the front and secure those as well


The Plaster Fun


once everything is constructed the fun part begins.

mix your plaster in small badges, its quite fast curing, mine was hard within 15 minutes, so don't mix up a whole bag at once. use a small bowl and start covering your shelf in a thin layer of plaster.

like you would paint it with textured paint.


it doesn't need to look arch-y or anything by now. just get the whole thing covered and rid of the wood showing through.


once the whole thing is covered i would suggest to let this dry over night.


cracks might form due to the wood working, but since were not done that's not something to worry about


the next day i mixed my plaster rather thick and started filling up the corners to form the arched tops of the little cubes.


the plaster should be kinda easy to squeeze and shape with your hands and disposable gloves.


just smudge it into the corners and roughly smooth it with your fingers


don't be scared to make a mess or of your surface doesn't look smooth. you can always fix that later on


once everything is shaped the way you like it let it dry.


ideally several days. the plaster will get totally white when dry.


singe i was a little bit in a rush i let it dry for 48 hours before i made the final 'smoothing' coat, but i would suggest to wait longer


to get rid of extreme bumps i mixed a rather thin batch of plaster and took a paint brush and brushed the watery plaster mixture over the whole thing, this way you close small holes etc


the final drying can take a good while, as you can see mine is while i took the pics still damp in some areas. it can take 1-2 weeks until everything is 100% dry. its like building a house - it takes a while. but I feel it worth it.


if cracks form: wait until completely dry and fill them with plaster. its important to let the base dry completely through before continuing, other wise you'll trap humidity inside.


you can sand it once dry if you want a super smooth look. i liked the natural texture. if you wanna avoid using lots of plaster you can fill the edges with paper mace or pu foam and cover that in plaster.


bottom of page